Search This Blog

Monday 21 October 2013

Group Policy - How to Add Internet Favorites via Group Policy with Internet Explorer 10

This is a guide on how to add Internet Explorer Favorites via Group Policy when you have clients with Internet Explorer 10.

Open Group Policy Management MMC

media_1382354847028.png

From a Windows 2008 and above server open the Group Policy Management MMC.

Create a Group Policy
media_1382354885757.png

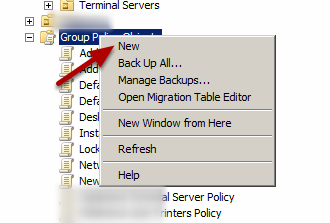
From the left hand pane, right click on Group Policy Objects and choose New

Name the Policy
media_1382354949177.png

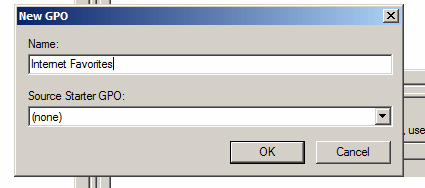
In this instance we will name the Policy Internet Favorites

Edit the Policy
media_1382354958090.png

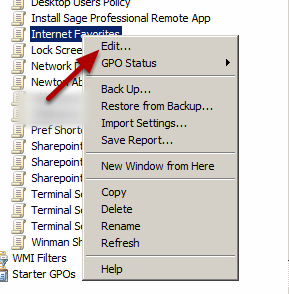
The Policy will now appear in the left pane and we can right click on this and choose Edit.

Create a Folder for the Favorites
media_1382355257131.png

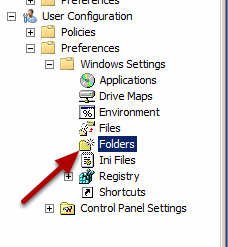
Expand the User Configuration, Preferences, Windows Settings down to Folders. On the Folders option right click and choose New, Folder.

Folder Configuration
media_1382355300844.png

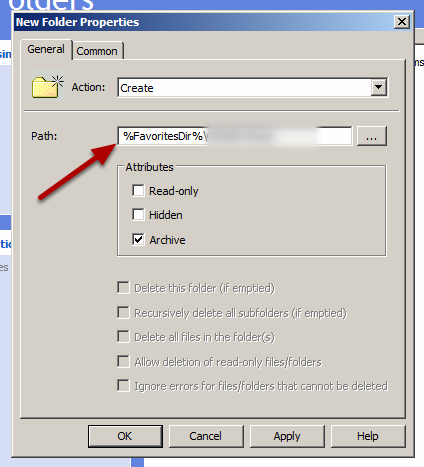
In the Path field we can enter the location for the folder, this should be the variable %FavoritesDir%\OurFolderName. Click OK to create.

Create a Shortcut for a URL
media_1382355352879.png

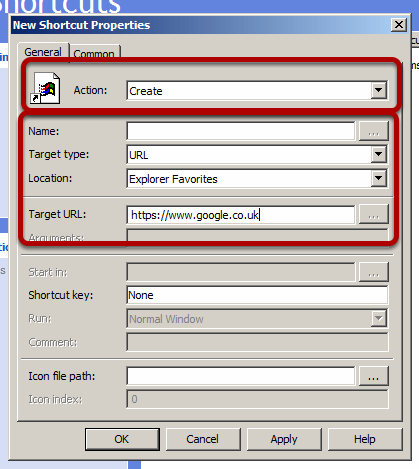
Expand the User Configuration, Preferences, Windows Settings, Shortcuts and right click to choose New Shortcut. Next set the Action to Create, the Name of the Shortcut in the format of our Favorites folder name from the above step and the name of the Favorite, so OurFolderName\OurFavorite

In the Target Type choose URL and in the Location choose Explorer Favorites.

In the Target URL enter the URL for the Web Site you wish to publish.

How to set a Favorite to a specfic Organisation Unit in Active Directory
media_1382355379811.png

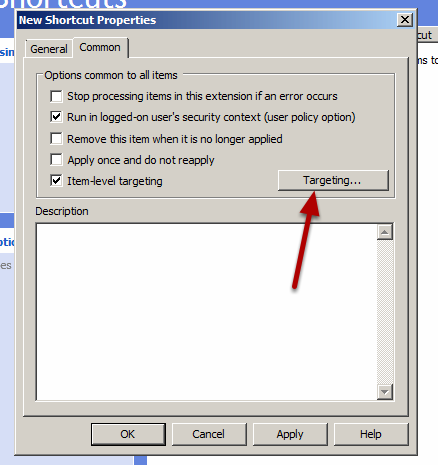
Often we will want to show one Favorite to one person in a OU and another to someone else in a different OU, this can be done in Group Policy with Item Level Targeting. To set these options choose the Common Tab in the object and then seletc Item-level targeting and choose the Targeting button.

Create a Targeting Rule
media_1382355388062.png

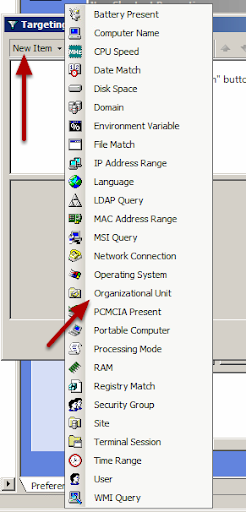
This Window allows you to create targeting rules based on multiple criteria, in this case we want to make a decision based on the users OU. Choose New Item, Organizational Unit.

Editing Target Rule
media_1382355408541.png

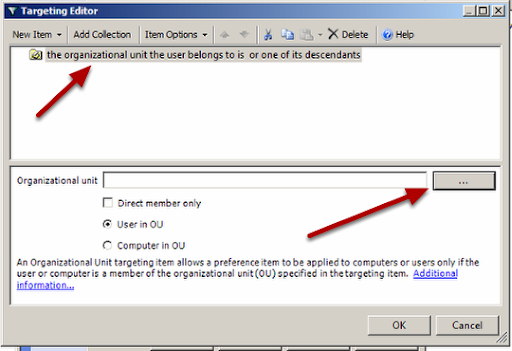
The rule now shows that if a user belongs to a OU then they will have this shortcut apply, to select the OU choose the button marked ...

Find OU
media_1382355418294.png

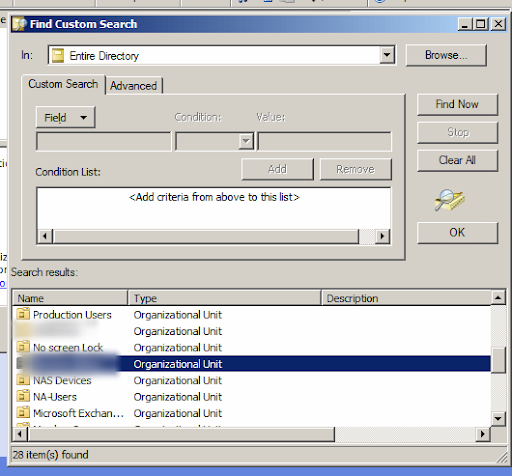
From the Active Directory lookup choose the OU for the users.

Updated Target Rule
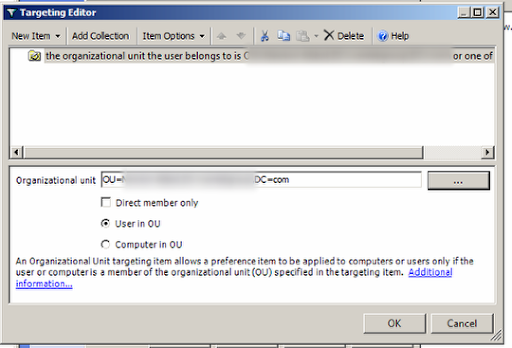
media_1382355425274.png

The OU is now selected and the target rule is updated.

Shortcut

media_1382355435188.png

You can now see the Shortcut is created for the Google Home Page.

Assign Group Policy to Active Directory
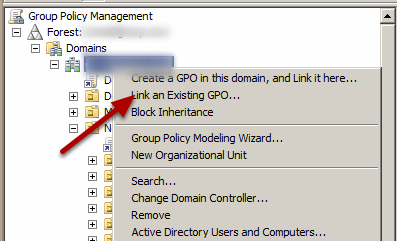
media_1382355452083.png

In the Group Policy Tree we want this Group Policy to apply to the entire Domain so right click on the top of the tree and choose Link and Existing GPO

Choose the GPO
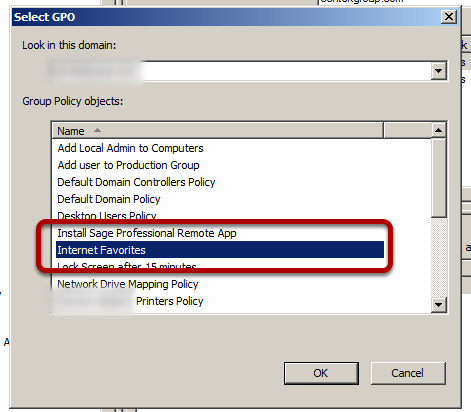
media_1382355460408.png

From the list choose your GPO

Policy is Assigned
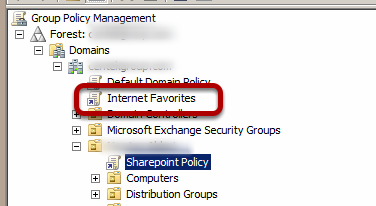
media_1382355467347.png

You can now see the GPO is assigned to the Domain and will now take affect.

Friday 13 September 2013

2X Thin Client - PXE boot NBP is too big to fit into free base memory

Having problems with a PXE Boot image that caused this error.

PXE Error

media_1379065081491.png

When you start the PXE Boot you are shown this error message

NBP is too big to fit in free base memory

DHCP Setting

media_1379065095724.png

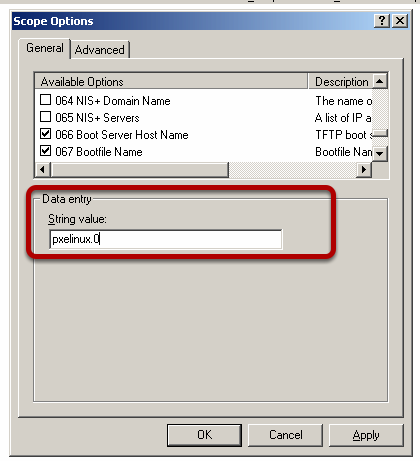
The issue is found in the DHCP Settings, you cannot load an IMG file straight into a PXE boot. The above image shows that the IMG file is being attempted to be loaded by the PXE boot. This will fail as it is too large to load at PXE boot.

PXE Boot File

media_1379065115727.png

The file you need to load is the PXE Boot file that then calls the IMG file you want to boot from. In this case I was using the 2X Thin Client and this has a PXELINUX.0 file in the TFTP root.

Update DHCP Option 67

media_1379065126292.png

In your DHCP config, update Option 67 to read the PXELINUX.0 file instead of the IMG file location.

Restart PXE Boot

media_1379065143651.png

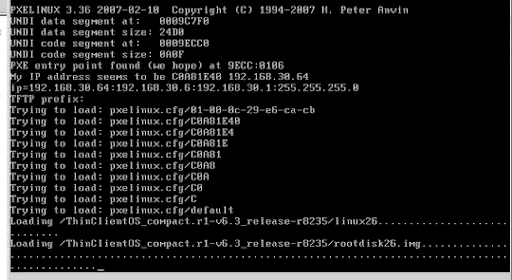
Now when you start the PXE boot you will see that the PXELINUX.0 boots and then loads the IMG file correctly.

2X Thin Client

media_1379065148309.png

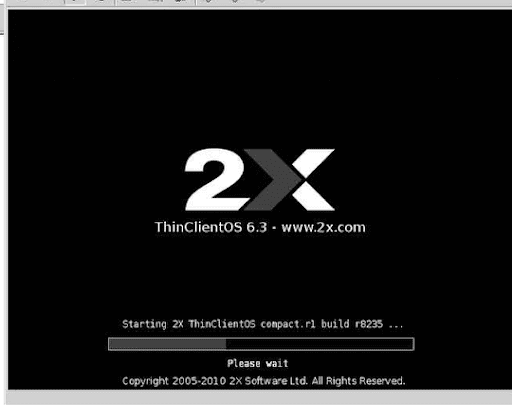
Now the 2X Thin Client boots as expected.

Thursday 12 September 2013

Outlook 2013 List Pane is Blank

After a Windows Update you notice your List Pane in Outlook 2013 is blank.

Blank Pane Problem

media_1378984621281.png
When you try to use the List Pane you can see it is blank and it is covering the lower pane list for Mail, Calendar and People.

Which Update caused this?

The Update that causes the problem is found here.

Wednesday 4 September 2013

How to move a user from a Parent Domain to a Child Domain with PowerShell

If you have a situation where you need to move a Active Directory object from a Parent Domain to a Child Domain you will find you cannot do this with the Active Dirrectory MMC.  You need Power Shell.

Here is the Power Shell for the task

move-AdObject -Identity"CN=HotChilli,OU=Overseas,OU=Staff,OU=Users,OU=daveshotsauce,DC=daveshotsauce,DC=Local" -TargetPath "OU=US,DC=us,DC=daveshotsauce,DC=local" -TargetServer "habenero.us.daveshotsauce.local"

Friday 9 August 2013

How To - How to customise a a Service Case Field

This guide shows how to amend a field in a CRM Case, in this instance it is the Type field in Case Details

Choose Settings

media_1376058278018.png

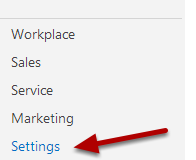
Select the Settings option

Customizations

media_1376058284322.png

From the Customization menu, choose Customizations.

Customize the System

media_1376058288605.png

Choose the Customize the System option

Entities

media_1376058305955.png

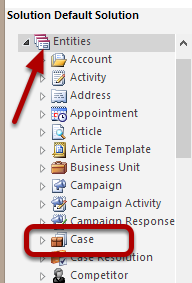
Expand the Entities option and then choose Case and expand

Fields

media_1376058358839.png

Select the Field option and then check the field you wish to amend, then click Edit.

Field Options

media_1376058377357.png

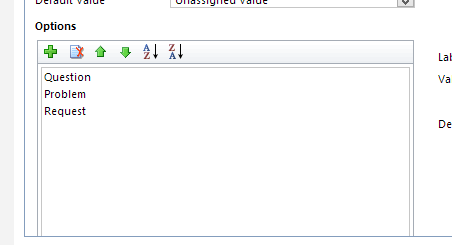
In the lower left of the pane you can see the Field Type Options you are presented in the Service Case.

Create a Type

media_1376058642538.png

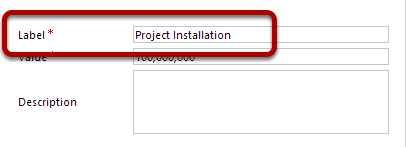
In the lower right pane, enter a value for the Type Label, the Value will increment by default. You can add a description if required.

Add Type

media_1376058648468.png

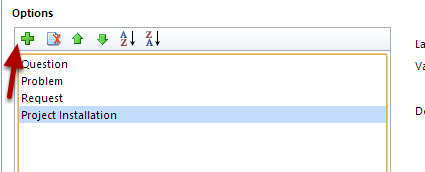
Click the green plus symbol to add the type to the field.

Publish Customization

media_1376058663340.png

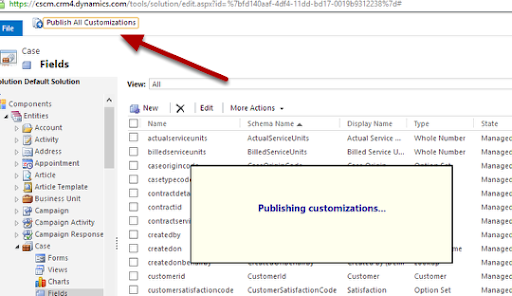
Click Publish all Customizations to update the CRM with the changes.

Wednesday 31 July 2013

Share Point 2013 - Access is denied. Verify that either the Default Content Access Account has access to this repository, or add a crawl rule to crawl this repository.

You have errors in the event log relating to being unable to crawl your Share Point Site. This is because the Loop Back feature of Share Point has not been disabled, this issue is described here http://support.microsoft.com/kb/896861

Error Message in the Crawl Log

media_1375258143816.png

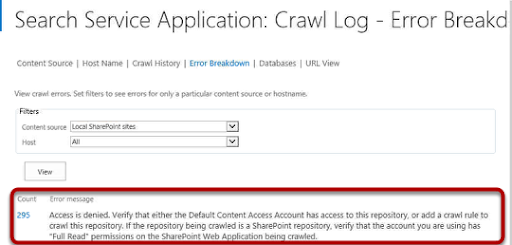
When you look in the Crawl Logs you can see the error listed for your Share Point Web Application.

Run PowerShell Script

media_1375258239259.png

You can disable the loopback feature with the PowerShell cmds

New-ItemProperty HKLM:\System\CurrentControlSet\Control\Lsa -Name "DisableLoopbackCheck" -Value "1" -PropertyType dword

Restart Share Point Server Search Service

media_1375259610988.png

Restart the Share Point Server Search Service 15 Service.

Start a new Crawl

media_1375258277485.png

In Share Point Central Administration, go to Crawling, Content Sources and then start a new crawl.

Crawl Success

media_1375259214879.png

You should now see your crawl has been successful.

Citrix - How to send CTRL ALT DEL to your session.

Press CTRL & F1

2013-07-31_08.10.01.png

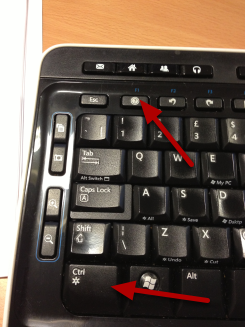
In a Citrix Session to produce the CTRL ALT DEL key combination, press CTRL & F1.

Choose Task Manager

media_1375254645999.png

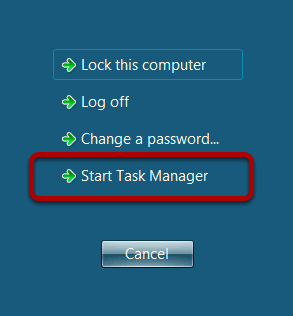
Choose Start Task Manager.

Task Manager

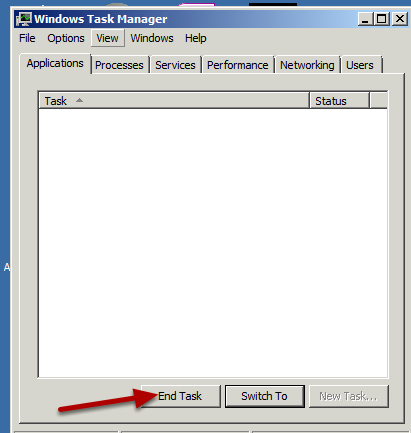
media_1375254654563.png

You now have access to Task Manager and if you need to end a task that is not responding you can do so.

Wednesday 24 July 2013

Small Business Server 2011 - Out Of Office Unavailable

Users report that they cannot set their Out Of Office, when you try to access EMC or EMS you are displayed with an error.

Out Of Office Error

media_1374660434476.png

The error message "Your automatic reply settings cannot be displayed because the server is currently unavailable." when a user tries to set their Out Of Office.

EMC and EMS Error

media_1374660453305.png

When you try to use the EMC or the EMS you are shown this error message that WinRM client cannot use Kerberos to connect to the local computer on port 80.

Cause of Error

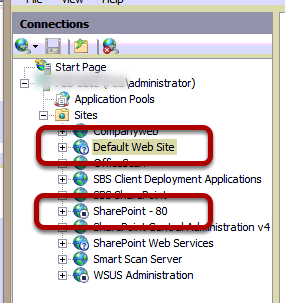
media_1374660470730.png

The cause for this error is that there is a web site in IIS that is running on port 80 and as a result of this the Default Web Site cannot use port 80. Above you can see the Default Web Site has a ? symbol and the SharePoint - 80 site is stopped. I have stopped the SharePoint site as it was running on Port 80 and stopping the Default Web Site from running on this port. I then restarted the Default Web Site and I could access the EMC and EMS again.

Stop Site from Running on Port 80

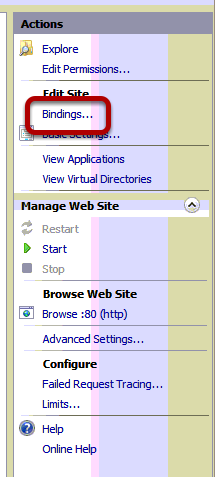
media_1374660690573.png

In the Actions Pane on the right side choose the Bindings option.

Set Start Up of Site

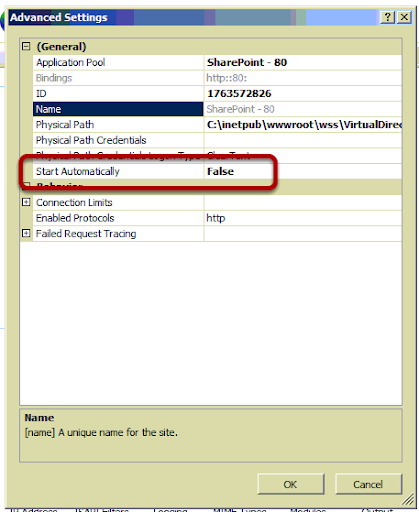
media_1374660695550.png

Ensure the Start Automatically option is set to false so the site will not start automatically again.

Thursday 11 July 2013

Blackberry Server - User displays Failed to Start in BES Console

User does not receive emails on their Blackberry Handset and in the console they are showing as status Failed to Start.

Step 1 - Error Failed to Start

media_1373533066765.png

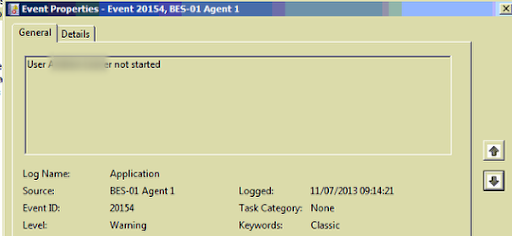
If you have Blackberry users who report that they have no emails on their handsets and you see the status Failed to Start in the console. Look at the event log for the following errors shown above.

Step 2 - Event Log

media_1373533078496.png

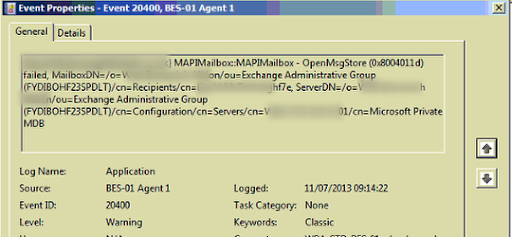
Check the Application event log for the errors 20400 and 20154. These relate to permission access to the users mailbox on a mailbox database. The cause is that you have a mailbox database that the Besadmin account does not have permissions to.

Step 3- Set Permissions for Besadmin to Mailbox Database

media_1373533088528.png

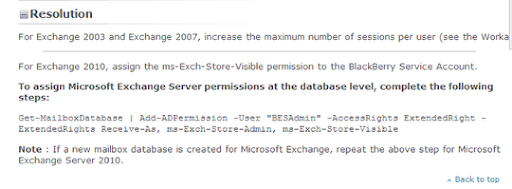
If you have Exchange 2010 then you have to set the permissions to the users mailbox database using Powershell. This is explained in this KB from Blackberry

Get-MailboxDatabase | Add-ADPermission -User "BESAdmin" -AccessRights ExtendedRight -ExtendedRights Receive-As, ms-Exch-Store-Admin, ms-Exch-Store-Visible

Once this is issue, restart the Blackberry Server and the users will show as Running in the console.

Thursday 4 July 2013

Exchange 2010 - How to renew a SSL Certificate with DigiCert Part 2

Part 2 of how to install an SSL Certificate for Exchange 2010

Step 16 - Order

media_1372937898708.png

The order is now processing and will be available in the next 30 mins.

Step 17 - Download Certificate

media_1372939657246.png

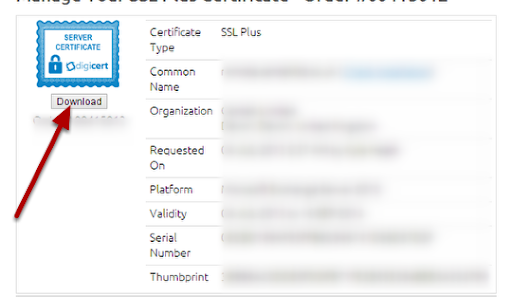
When the Certificate is available choose the option to download the certificate, choose the right version for your Server Software.

Step 18 - Transfer CER file to Exchange Server

media_1372939734523.png

Transfer the CER file to the root of the Exchange Server.

Step 19 - Import CER file with Powershell

media_1372939785824.png

Import the CER file using the following Powershell cmd

Import-ExchangeCertificate -FileData ([Byte[]]$(Get-Content -Path c:\mycert.cer -Encoding byte -ReadCount 0)) | Enable-ExchangeCertificate -Services "IIS,POP,IMAP,SMTP"

Step 20 - Check Certificates in use

media_1372940041464.png

Use the Get-ExchangeCertificate cmd to check the certificates installed, you will now see you have the renewed certificate and the old certificate. You now need to remove all the old expired certificates.

Step 21 - Confirm Renewed Certificate

media_1372940065057.png

Use the Get-ExchangeCertificate | FL cmd to show the certificate details and confirm the renewed certificate is installed as Valid and has the correct notAfter date.

Step 22 - Remove Expired Certificates

media_1372940196350.png

Use the Get-ExchangeCertificate cmd and find any certificate that has expired or is no longer required. Copy the Thumbprint to the clipboard.

Step 23 - Remove Certificate cmd

media_1372940240293.png

Enter the cmd to remove the certificate with the Thumbprint on the clipboard.

Remove-ExchangeCertificate -Thumbprint Thumbprint

Step 24 Check Certificate on Service

media_1372940342451.png

Visit the Exchange Outlook Web App and check the certificate displayed is the renewed certificate.