Search This Blog

Saturday 30 June 2012

How to use Join.me to share your Desktop with another person

If you need to share your Desktop with another person for a training session for example, you can do so easily and quickly with Join.me

Go to https://join.me

media_1341079066737.png

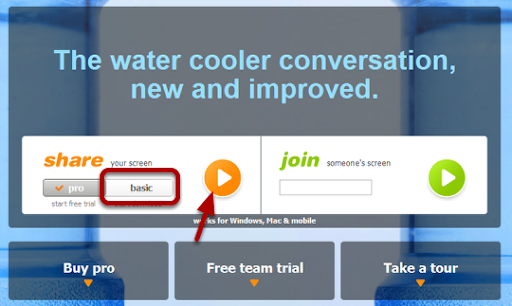
Open Internet Explorer and then go to the site https://join.me from here you can see the Join Me page. Click on the basic option in the share section. Then click the orange arrow.

Install Join.me

media_1341079095284.png

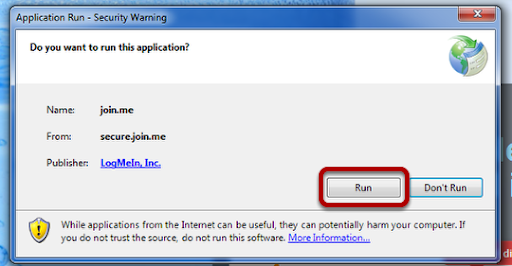
To be able to share your desktop you need to run the Join.me application, this is a one time install. Click run.

Installing

media_1341079106060.png

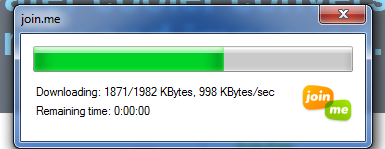
The Join.me application will now install.

Up and running

media_1341079127528.png

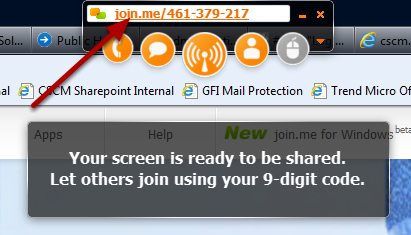
Once installed you will see a message to tell you that can now share your desktop. Note the 9 digit code at the top of the screen in the format xxx-xxx-xxx

At the screen of the person who you want to share with

media_1341079222875.png

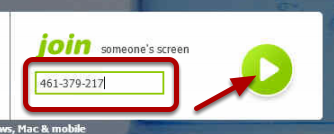
Contact the person you want to share with and ask them to visit https://join.me and enter your 9 digit code into the Join section and then click the green arrow.

Vistor joins

media_1341079241621.png

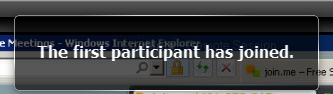
You will now see a message to say the other person has joined, they can now see your desktop but they cannot interact with you until you give them permission.

Give the visitor access

media_1341079266865.png

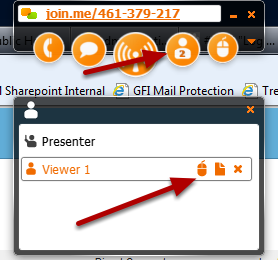
Click on the Person icon and below a small window opens, click on the icon of the mouse and you can share your desktop with the visitor.

Visitor has access

media_1341079317776.png

You have now given the visitor access to your desktop and then are able to move your mouse and interact.

Complete session

media_1341079360071.png

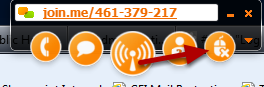
When you have finished your session and you want to take control of your desktop back, click on the Mouse icon with the X

Revoke access

media_1341079381388.png

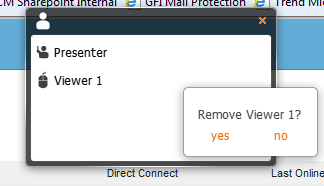
Choose yes to disconnect the visitor.

Finish Join.me session

media_1341079492965.png

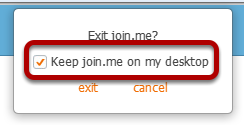
Finally to close your session, click on the X to close the application and remember to remove the check for keeping Join.me on the desktop.

Thursday 28 June 2012

XenApp Server 6.5 - a usable server cannot be found on which to launch the application

Error launching a published application on a XenApp 6.5 Server

XenApp 6.5 Event Log

media_1340872607456.png

I spent several hours on a new XenApp 6.5 installation trying to work this out, I had published Adobe Reader X and everytime I launched it from the web interface I had this error that a reidrection error had occured. I checked the event logs on the XenApp Server and the message above was shown in the event log. I spent a lot of time trying to figure this out with it being my first XenApp installation so these are the points to check.

  • Confirm you have created a Worker Group for the XenApp Server and added your server to this group
  • When publishing the application, publish it to the Worker Group
  • Check your ACL on any routing between VLANS, I was building a hosted environment so I had ACL between my XenApp Server and my WI Server and I had missed 1494 and 2598 going from my XenApp Server back to my WI Server.

This solution may be due for more updates as this is a learning curve but as there is a lot of information our there on this issue that was not relevant I thought I would get out there what I did.

Tuesday 26 June 2012

Windows 2008 R2 Remote Desktop Services - The task you are trying to do can't be completed because Remote Desktop Services is currently busy

A user cannot logon to a Windows 2008 R2 Server, other users may be connected and be able to reconnect.

Error Message

media_1340699016905.png

This issue is recorded in a Microsoft KB Article http://support.microsoft.com/kb/2661332 and it is caused by an issue with Csrss.exe and Microsoft Excel or Visio.

Microsoft KB Article

media_1340699576140.png

There is a hotfix for this issue, request and install the hotfix. I did this while the server was in production, not best practice but I had little choice as my customer would not tolerate a reboot at that time.

Restart Services

media_1340699354662.png

To enable the hotfix I restarted the Remote Desktop Services Service, often this is all the reboot does when it is requested.

Powershell - Number of Mailboxes per Database

A quick Powershell that is worth sharing is this command to display the number of mailboxes per database.


Get-MailboxDatabase | Select Server, StorageGroupName, Name, @{Name="Number Of Mailboxes";expression={(Get-Mailbox -Database $_.Identity | Measure-Object).Count}} | Format-Table -AutoSize


Thanks to Teknologist for this http://bit.ly/Nv1KIB

Wednesday 6 June 2012

Acronis - Uninstall the SQL Server Instance when removing version 10 & 11

When Acronis Backup & Recovery is uninstalled the application does not remove the MSDE SQL Server 2005 Express database so you have to remove this manually. Why is this important? This MSDE instance will take up disk space and CPU cycles running for no purpose as you have removed the application it served.

Acronis CMS Files

media_1339012801087.png

The files here are the database files used by Acronis CMS and that are taking up disk space on our server.

Acronis MSDE Instance

media_1339012818464.png

If you run the SQL Server Studio Management you can see the instance we are referring to SBIZ\ACRONIS in this case.

Database Files

media_1339012828393.png

Here are the SQL Server database files attached and online even though we have removed the Acronis application.

Uninstall SQL Server 2005

media_1339013165552.png

Acronis uses SQL Server Express 2005 so choose Uninstall for this application.

SQL Server 2005 Uninstall

media_1339013178100.png

Select the instance for ACRONIS.

Uninstall Warning

media_1339013187241.png

Click Finish to confirm the uninstall.

Error during Uninstall

media_1339013224666.png

You may encounter the above message while uninstalling, this is because the SQL Server (ACRONIS) Service is running the process sqlserver.exe

Stop Service

media_1339013252415.png

In the Services MMC stop the service.

Error for Process ID

media_1339013289840.png

You may see a further error, this can be more difficult to work out what needs to be closed. The number shown is the Process ID or PID, this is the process that has a handle on the file we want to remove.

Find the Process

media_1339013311965.png

To find the Process open Task Manager.

View PID Column

media_1339013321142.png

From the menu, choose View, Select Columns.

Choose Column

media_1339013327021.png

Select the PID Column

Show Processes from All Users

media_1339013345090.png

If the process is not running under your user context you will need to show process for all users.

Find the PID

media_1339013377046.png

Here you can see the PID that we need, 3860. This is an instance of sqlserver.exe, although we closed the instance for ACRONIS there are still other instances running.

Stop Services for other instances of sqlserver

media_1339013477254.png

Stop the service for all other instances of SQL Server running.

Complete Uninstall

media_1339013523438.png

Restart Services for other instances

media_1339013612689.png

Restart the instance you stopped before. Note that the service for SQL Server (ACRONIS) is now gone.

Delete manually the database files.

media_1339013653791.png

You are now safe to delete the database files.

GFI Mail Archiver does not display the Configuration Tab for an Administrator

If you open the Mail Archiver Console you do not have access to the configuration tab even though you are an administrator. This is caused by the Windows UAC feature. UAC stops the features of the Configuration tab from loading and being available. This isue is outlined in the GFI KB article - http://kbase.gfi.com/showarticle.asp?id=KBID003893

Run Mail Archiver

media_1338984620787.png

Applications Launch

media_1338984627351.png

No Configuration Tab

media_1338984635155.png
The Configuration tab is not displayed.

Run Internet Explorer as Administrator

media_1338984644796.png
Run Internet Explorer as an administrator

Agree to UAC

media_1338984653399.png
You can now agree to the UAC to elevate privileges in advance.

Browse to the Mail Archiver Location

media_1338984663955.png
Enter the address http://localhost/mailarchiver

Configuration Tab is available

media_1338984669440.png
The conifguration tab is now available.

Tuesday 5 June 2012

Cisco - Debug a RFC 1483 Bridged DSL Circuit

If you have a IPoE connection which will use a bridged connection on your DSL circuit and you have a Cisco IOS router then use this guide from Cisco to help debug your connection.

http://www.cisco.com/en/US/tech/tk175/tk15/technologies_configuration_example09186a008071a883.shtml

Cisco ASA - Rate Limit Outbound Connections

How to rate limit the bandwidth for an outbound conection through an ASA 5510.

Cisco ASA CLI

The Cisco ASA 5510 will allow for control over the bandwidth and burst rate allowed through an interface, the config below will show how you can control outbound bandwidth through the outside interface.

First create an access list that will match the interesting traffic, in this case the IP address 10.10.0.40 represents the internal server on our network used for testing.

access-list acl-police-bandwidth extended permit ip host 10.10.0.40 any
access-list acl-police-bandwidth extended permit ip any host 10.10.0.40

Next a class map is required to match the traffic we want in our policy map, if you have used Zone Based Firewall before then this will make sense. The class map matches the access list we have created.

class-map cmap-police-bandwidth
match access-list acl-police-bandwidth

Now we need to create a service policy, this will match the class map. This is the Cisco way of nesting objects, it is logical but can be confusing sometimes.

policy-map pmap-police-bandwidth
class cmap-police-bandwidth
police output 1000000 2000
police input 1000000 2000

Last we create a service policy and this is assigned to an interface. In this case this will inspect all traffic in both directions through our Internet facing interface but because we are using PAT we can match only on traffic to and from our internal IP address and so allow all other IP addresses utilise as much bandwidth as they need.

service-policy pmap-police-bandwidth interface WaveNet

Sunday 3 June 2012

Vmware - Cannot create a snapshot error -3491

As part of my recovery of a Sharepoint Server in vSphere, I decided once the server was all restored that I would take a Data Recovery Backup, but when I attempted this I received the error.

error -3491 cannot create snapshot

Snapshots all involve the VMFS and are related to all the files in the datastores for each virtual machine.  Now you have to be really careful with these files as they are the workings of each virtual machine, but you can if you are careful manipulate these to resolve problems.

In my case this article from Vmware resolved my problem.

http://kb.vmware.com/selfservice/microsites/search.do?cmd=displayKC&externalId=1008058

I had a -delta.vmdk file that was orphaned and not linked to my vmdk files so I downloaded the virtual machine vmx file and checked that this -delta.vmdk file was not referenced and then moved the file to a backup folder in vmfs.

Once this orphaned file was removed I could run a Data Recovery backup and take a snap shot again.

Vmware Virtual Machine running Windows 2008 R2 Server will not boot with error STOP c000021a

I migrated one of my Sharepoint Servers running in a vSphere 4.1 virtual machine, the migration went fine but when I came to start the guest I found it would not boot up, it booted to the Windows Recovery and then the recovery console could not repair the installation.

So I spent the next day literally going though every option in Windows Recovery Console, bcdedit and bootrec both helped get from a total non boot message of "bootmgt is missing" to a point where I could find my Windows installation again.

The next issue I had was that Windows would start to boot but it would hang on the green progress bar and black boot screen, I thought it may take some time so I left it for several hours and it made no difference.  So back into recovery console I used diskpart to look at the partitions and volumes and I could see that both my System Reserved and Boot partition were there but the System Reserved was set as hidden.

Using diskpart I changed this volume to not be hidden, this is volume 1 on a disk that runs Windows 2008 R2. I restarted the guest and now it would boot but then display an error "autochk program not found - skipping AUTOCHECK" this would then be followed with a BSOD with the error STOP c000021a.


Now this STOP error is you Google is usually a game ender but never one to quit I tried a search on Vmware knowledge base on this and hey presto I found this article.

http://kb.vmware.com/selfservice/microsites/search.do?language=en_US&cmd=displayKC&externalId=2004505


The answer is to use diskpart and make sure that the System Partition in Windows 2008 R2 does not have the value nodefaultdriveletter assigned to it.

So use the list volume command and if the volume has the value of true for nodefaultdriveletter then you need to change this as below

diskpart
list volume
select volume 1
attributes volume
attributes volume clear nodefaultdriveletter


I started the guest and it booted as normal!  This one change has saved me a Sharepoint rebuild and was worth the 12 hours of trouble shooting to learn to keep my ESXi servers up to date!

Friday 1 June 2012

Distributed File System - Error "the share must be removed from the distributed file system before it can be deleted"

If you are trying to remove a share and you receive the error "he share must be removed from the distributed file system before it can be deleted" when you try to remove this, you need to remove the share from DFS. If you cannot access DFS any longer and this is an orphaned share you can remove it manually from the registry.

Edit the registry and remove the share from the DFS Name Space

media_1338548094159.png

Edit the registry and browse to HKLM\Software\Microsoft\Dfs\Roots\Domain and then look for the share name and delete the registry key.